There are two ways to insert a text box in a Google Document. You can create a table with multiple rows and then insert a text box in the table. You can also edit the text box by editing its appearance. If you want to create a fillable form, you can also insert a fillable form. Both ways are described in the next section. To get started, open a Google Document.
Create a table with multiple rows to insert a text box
The easiest way to insert a text box in Google Doc is to use a drawing tool. This tool will allow you to adjust the height and width of a text box. You can even use it on mobile devices. The main difference between the drawing tool and the regular text box is that you can customize it. In this article, we will show you how to create a text box in Google Docs.
To create a table in Google Docs, first click the upper-left box. Next, click the Insert Table button. You can then type text in any cell. You can change the font, color, and size. This method gives you more creative freedom and flexibility, but it will take more time. Adding text boxes and shapes to your table will allow you to insert them into your document more easily.
Edit a text box
When using Google Docs, you can easily edit a text box. Just click the text box you want to edit and choose the formatting options that you want. You can choose the text color, font, border style, and line spacing. You can even change the background by clicking on the paint bucket icon on the main toolbar. You can also change the font style and color and add a dash to it.
You can also set apart your text by selecting a table or drawing in Google Docs. While both methods will create a text box, the text in a drawing or table will have distinct layout and formatting capabilities. If you accidentally delete your text box, you can easily undo it. It will appear as a placeholder. It will remain available until you re-add it to your document. Alternatively, you can insert a text box in a drawing.
Add a fillable form
You can create a fillable form within Google Docs and track the responses from your survey. Once you've received the data, you can also generate a visual report. Fillable forms can be embedded on your website or included in social media posts or emails. Note that this article is not sponsored by Indeed.com, but provides a general overview of how to create a fillable form within Google Docs.
To add a fillable form to a text field, first create a label next to the empty line. For example, if you have three fields, add the label "Two Lines of Text" to the cell label. Now, select the left-most cell label, change its text to "Sample Answers." You should now have a form that looks similar to the example below.
If you've recently moved to a new city, state, or country, you may want to learn how to change address on your driver's license. If you've moved recently, or are in the process of moving, there are several important steps you need to take. You should update your address with the SCDMV. Once you've updated your address on your driving license, the South Carolina Election Commission will receive it.
Update address on driving licence
If you have moved, you will need to update the address on your driving licence and health card. You will also need to update your vehicle permit. To update your vehicle permit, visit a ServiceOntario centre. If you already have one, you must bring it with you. If you don't, you may need to pay a replacement fee. Make sure you provide the DVLA with your complete new address, including street and unit numbers. Make sure you provide the postal code and city as well.
In order to update the address on your driving licence, you need to have a new driver's license, non-driver ID, or permit. If you have a permit, you must fill out form #VL-040, which requires an appointment. In Vermont, you will need to make an appointment at the DMV to change your address. You should also make sure your license is not disqualified because of your old address.
SCDMV sends changes of address to South Carolina Election Commission
If you're not registered to vote in South Carolina, you should make an appointment to change your address with the South Carolina Department of Motor Vehicles. You can do this online or by mail. You should remember to bring all required documents, such as a photo ID, when you register. Make sure that the address on your voter registration is current and that your voter registration form is up-to-date. Then, mail your updated voter registration card or form to the county voter registration office.
To update your South Carolina driver license, go online and fill out the address change application. The form requires a South Carolina ID, date of birth, social security number, vehicle plate number, and driver's license number. To change your address in South Carolina, you will need to have a birth certificate or social security card or a copy of your driver's license. You should also send a copy of your driver's license to the Election Commission.
We all know what it's like to mourn the loss of a friend, family member, or other close person; we wear black, go to the funeral, and honor the life they lived.
The process of dealing with someone's death, however, becomes more challenging if you are the executor or chosen representative.
You find yourself suddenly in charge of sorting through this person's life, possessions, and documentation.
Not only is it difficult to determine which papers must be retained, but it's also not always clear how long they must be kept.
While a qualified law firm may assist you in sorting through records and choosing which documents to save, the following list of items should be preserved and for how long:
HOW LONG SHOULD TAX RETURNS BE KEPT?
The tax returns are typically the main issue when handling a deceased person's legal records.
The four-year statute of limitations applies to tax audits. This permits the CRA (Canada Revenue Agency) to audit the deceased's tax returns at random for the following four years.
Despite this statute of limitations, it is advised that you keep all tax documents for at least six years in case any issues with the decedent's returns come up.
This contains any files that have been filed as well as significant tax forms and receipts.
Documentation for a deceased person goes beyond tax filings.
Despite the fact that keeping track of all the paperwork may seem burdensome, the following key records should be preserved in four different categories:
LEGAL RECORDS
Any document pertaining to the law, whether it be federal, provincial, or local, is considered a legal record. Records of this nature ought to be preserved indefinitely.
This implies that all legal records must be transferred from beneficiary to beneficiary.
Therefore, if you have inherited these documents, you should save them with your own important documents and provide them to your beneficiary.
These records include the death certificate for the deceased as well as the records listed below:
Birth certificate
Social security card
Marriage certificate
Divorce decrees
Legal will
Death certificate
Any of these documents can be needed to handle estate-related business. Particularly, you should have proof of your marriage, prenuptial agreement, and/or divorce since if you don't, estate issues might arise.
If nothing else, you might want to save these significant papers for family history or genealogy purposes.
FINANCIAL DOCUMENTS
The necessity of preserving the decedent's tax returns has previously been mentioned, but there are additional financial records that must be preserved as well.
These records need to be kept for at least three years after any required estate taxes have been paid.
Financial records of importance include:
Account statements
Receipts
Pay stubs
Retirement benefit and distribution statements
Tax returns
These documents might be required during a tax return or possibly an audit, so it is essential to have them on available.
MEDICAL DOCUMENTS
It is recommended to save medical records and information for at least ten years.
However, due to privacy rules, you would need to be a designated representative or legal executor of the person's estate in order to access their medical data.
Important medical records include, for instance:
Health insurance cards
Medical tests
Medical history
Prescriptions
Hospital discharge papers
These records will assist in determining the deceased's health coverage options and any ailments they may have had (or did not suffer from).
This knowledge is particularly beneficial because it enables family members to determine whether any of these ailments are inherited.
Additionally, you might wish to maintain track of the visits and treatments that were given by keeping paperwork of the outcomes of hospital stays.
OTHER IMPORTANT DOCUMENTS
After a person dies, you could find yourself going through a collection of unrelated paperwork.
How do you decide what to save and what to discard?
Be sure to maintain the following records before discarding anything that is not legal, financial, or medical:
Diplomas
Home and car insurance
Rental agreements
Mail
If you and the deceased lived together, you can still handle their correspondence and read their mail. You might want to think about getting in touch with the sender to let them know the person has passed away.
Before you may make any changes to the deceased's postal service if you did not reside with them, you must show that you are the executor of their estate.
In addition to mail, you should aim to maintain these records for at least 10 years, especially the home and auto insurance records because they can be useful in effectively administering the estate.
Other than that, degrees are rarely legally necessary for anything but could hold sentimental value.
ORGANIZING IMPORTANT DOCUMENTS
It can be difficult to sort through a deceased person's possessions, especially when there is paperwork involved.
Purchase an accordion file folder to arrange the workload and make it less stressful by dividing the paperwork by year.
Every year, check the folder to see what information no longer needs to be preserved and make sure to label everything.
Do not hesitate to get in touch with your qualified attorneys if you are managing the papers of a deceased family member, friend, or loved one.
We will take the time to help you understand the paperwork and make sure that the important papers are kept secure.
The kind of slideshow you're making in Microsoft PowerPoint may or may not benefit from the use of music. You can wish to use a lively exuberant music on a slide or a delicate, understated melody all through the presentation.
We'll go over a few alternative methods for adding music to PowerPoint before demonstrating how to use a single song on a slide or play background music continuously.
Upload a song from your computer
Uploading a song from your PC is most likely the simplest approach to include music in your presentation. This song may be one from your playlist or one you've saved and frequently listen to.
Step 1: Open your PowerPoint presentation and select a slide to add the music.
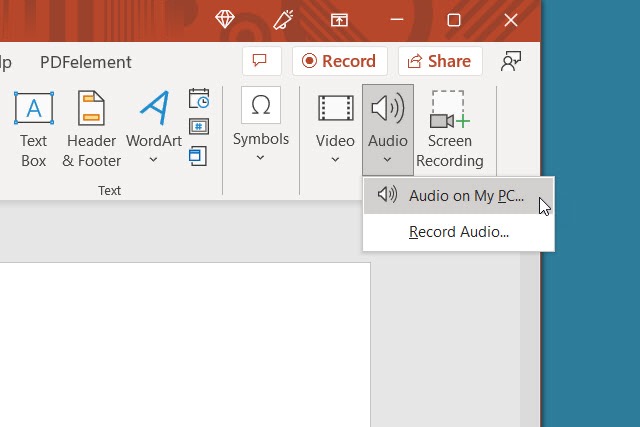
Step 2: Go to the Insert tab and choose the drop-down arrow for Audio on the right side of the ribbon.
Step 3: Pick Audio on my PC, browse for the music file, and select Insert.
Step 4: You’ll then see an audio icon on your slide for the song.
Step 5: Use the Play button to listen and the Playback tab to adjust the playback options.
Download free music
Perhaps you already know the kind of song you desire, but your computer doesn't contain a copy of it. There are a few web sources where you may get free tracks with no royalties for presentations.
Fesliyan Studios Inc.: Choose a genre at the top such as commercial, happy, sad, or relaxing. Press the Play button to listen, then check out alternate versions where available. Choose Download to get the song.
Chosic: You’ll see a slew of songs for presentations from upbeat to soft. When you hear the song you want, select Download > Free Download.
SoundCloud: If you’re already a SoundCloud listener, this is a good option for presentation music. Type “free downloads” or similar into the search box and review the results. When you find the song you want, select More or the three dots to download the tune.
There are a few ways to download MP3s from YouTube if you can also discover free music there.
Once you've downloaded a music from this list, store it to your device and then upload it to the slideshow as previously mentioned.
Record music while creating the slideshow
You can record a song right in PowerPoint if you're fortunate enough to be musically talented. Make your own presentation music by warming up your voice chords or picking up a guitar.
Step 1: Open your PowerPoint presentation and select a slide to record the music.
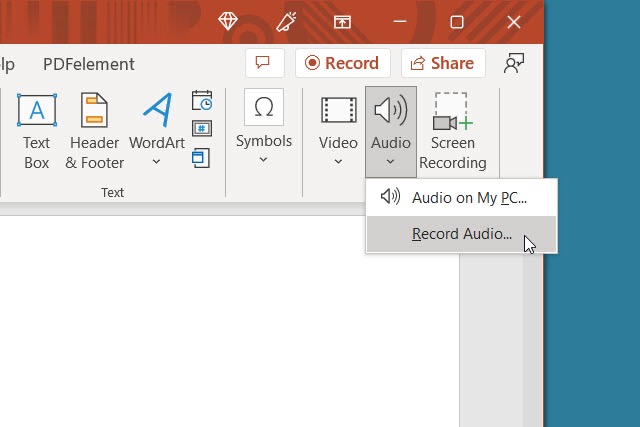
Step 2: Go to the Insert tab and choose the drop-down arrow for Audio on the right side of the ribbon.
Step 3: Pick Record audio. Note: You must have either a built-in or external microphone for your computer.
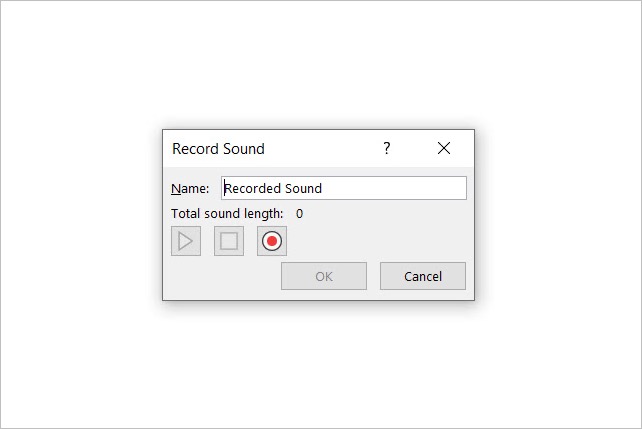
Step 4: When the Record Sound box appears, select the red, round Record button to start recording.
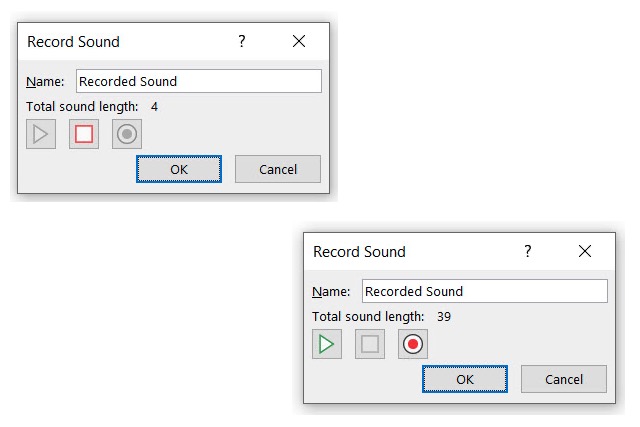
Step 5: Press the square Stop button when you finish. To listen to the recording, press the green Play button.
Step 6: When you finish, select OK to insert it onto the slide.
Step 7: You’ll then see the audio icon just like with an inserted audio file. Press the Play button to hear the recording.
Add an offscreen video
Sometimes a video is associated with the perfect song for the circumstance. There is a workaround to include that song in your show even though you can't currently just play the audio and you definitely don't want the video as part of your presentation.
Step 1: Open your PowerPoint presentation and select a slide to add the video.
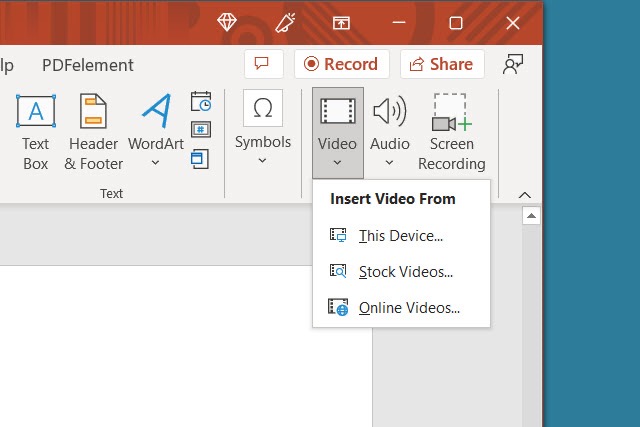
Step 2: Go to the Insert tab and choose the drop-down arrow for Video on the right side of the ribbon.
Step 3: Pick This Device, Stock Videos, or Online Videos and follow the prompts to insert the video.
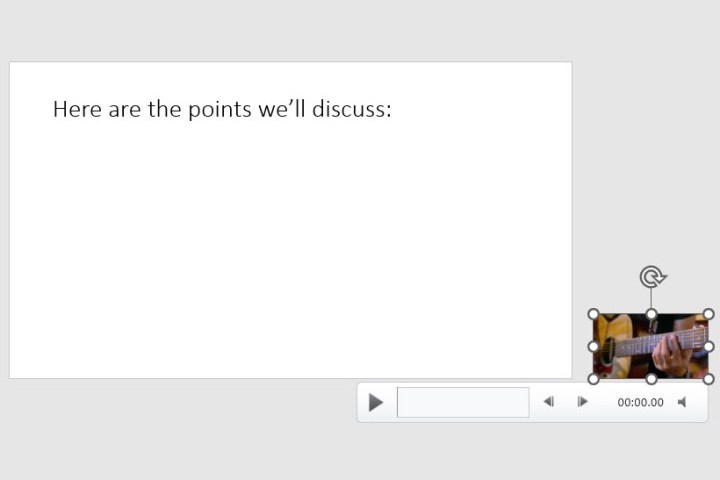
Step 4: When the video appears on the slide, drag a corner or edge to make it smaller and then drag it off of the slide to one of the sides.
With this, you can play the video to hear the audio only—you won't be able to view it in your slideshow.
Step 5: Select the video and use the Playback tab to adjust the options for playing it when clicking the slide or automatically.
Play the song or use as background music
Once you've added the music to PowerPoint, you can decide whether it should play continuously during the presentation or only on one slide.
Step 1: Go to the slide containing the music and select it.
Note: Depending on your preference, you'll probably want the file on the first or second slide if you want the music to play continuously throughout the slideshow.
Step 2: Head to the Playback tab and choose to play the song with the slide or as background music.
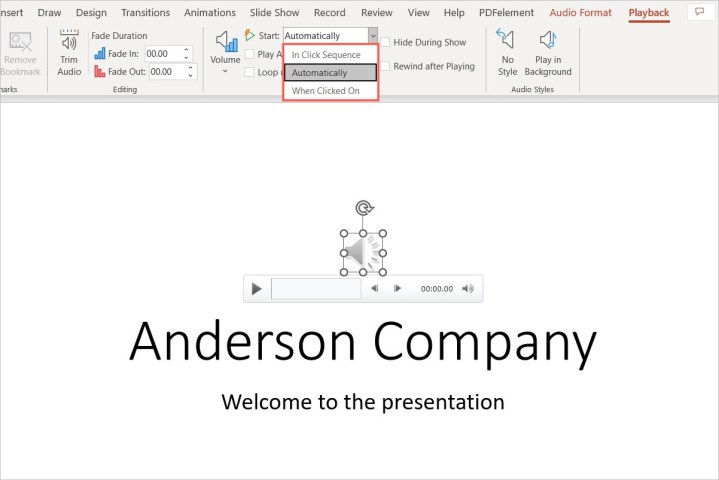
Step 3: To play the song only on that slide, choose the Start drop-down box in the Audio options section of the ribbon and pick how you want the music to begin. You can select In click sequence, Automatically, or When clicked on. When you advance to the next slide, the song stops playing.
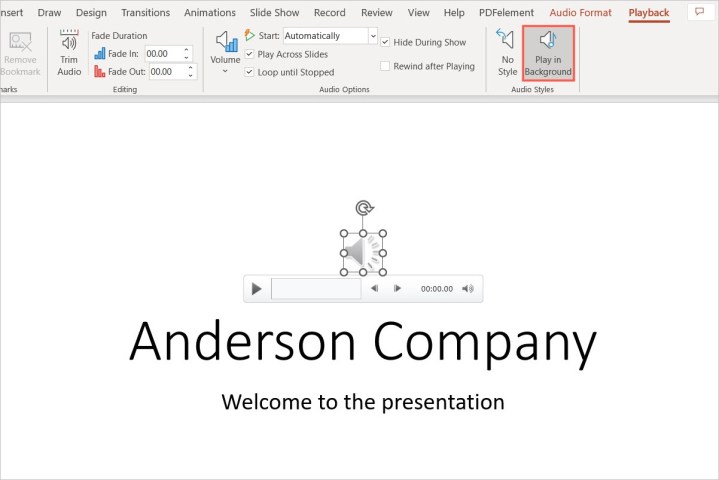
Step 4: To play the song throughout the presentation, select Play in background in the Audio styles section. This automatically checks the boxes for Play across slides and Loop until stopped. You can also choose an option in the Start drop-down box for how to begin playing the song.
Remember that the method mentioned before, which uses video files, does not apply here; only audio files do.
Step 5: Adjust any other options on the Playback tab per your preference. You can increase or decrease the volume, rewind the song after it plays, or add a fade in or out effect.
After you've included the music, don't forget to practice your presentation to make sure it sounds the way you want it to. You can also think about including closed captions for hard of hearing people.
If money is tight, getting the wedding you desire could be difficult to arrange. Even though it may feel like you're spending a lot, most couples experience sticker shock once the costs are added together. The location, the food, and the bar packages all add up quickly, and the final cost is much higher than you anticipated. If the sum seems excessive to you, you might be looking for fresh inspiration. Or perhaps you always desired a destination wedding. Consider exchanging vows on a white-sand Caribbean beach. while exchanging vows on a beach with white sand and blue ocean. But how much will that cost? Is there a chance you may have a destination wedding if you can't afford a wedding at home?
Is a Destination Wedding Really Cheaper?
Unbelievably, a destination wedding at an all-inclusive resort may be even less expensive than the simplest domestic nuptials. Because fewer visitors will attend, some savings will result. By selecting a wedding package that comes with everything at the resort, you'll save even more money. You must organize a large number of vendors, décor, and other expenses for an at-home wedding, which quickly add up. You can select a package at an all-inclusive resort that includes everything you need for a wedding. You are well aware of the value you are receiving and the cost. Even though you may need to purchase a few more items, such as wedding attire and invitations, it is far simpler to keep your expenses in check. The origin, season, and location you choose will all affect the exact cost of your destination wedding. for an overall sense of costs and a model budget.
How Do You Plan a Destination Wedding On a Small Budget?
A wedding ceremony and reception set up on the beach.
1. Set the Total Budget For Your Destination Wedding
Even while a destination wedding will be significantly less expensive than one at home, you'll still require at least a few thousand dollars. You'll be responsible for paying for your travel costs, the resort's wedding package, your wedding attire, and additional costs. Determine the total amount you are able to spend. How much money have you saved up? How much can you put aside before your wedding? Do any relatives want to make a contribution?
2. Budget For Your Travel Costs
In general, Canadians can reserve a charter package that combines the cost of the flight and the resort. If you're an American, you'll reserve your hotel separately from your flights. Regardless of where you reside, think about speaking with a travel agency. You shouldn't have to pay more for it. Once you make a reservation, the airline and hotel will often pay the travel agent a commission. They'll assist you in picking the ideal resort, securing your benefits, and maintaining group organization. Use a travel website to look up a few places and compare prices to get a basic idea. If you don't have a certain place in mind, start with the most well-known and find out how much the flight will cost from the airport that is the nearest to you. Next, look into the costs of a few of the resorts. The most well-known and reasonably priced places to start are in Mexico's Cancun. Ocho Rios, Jamaica, and Punta Cana, Dominican Republic.
3. Budget For Your Wedding Package
The majority of resorts provide three types of wedding packages: basic, upgraded, and luxurious. Everything you need for a wedding is typically included in even the most basic package. In addition to chairs and decorations for a specific number of guests, you will also have a symbolic ceremony. Cake and sparkling champagne are typically included with the basic package. A semi-private dinner at one of the resort restaurants is also included. Typically, a basic package is for 10 persons. More than ten guests will require an upgraded or deluxe package. A more expensive package will typically accommodate 20 to 30 people. For 30 or more visitors, a deluxe package will be offered. Larger packages will contain more features in addition to having more guests. Larger or nicer products, such flowers and decorations, may be included in upgraded and luxury packages. They occasionally also offer supplemental services like hair and makeup or photography. Cocktail hours or private dinners could also be included in upgraded and luxury packages.
4. Budget For Your At Home Costs
Most couples get legally married in advance, at home, to avoid communication difficulties and additional paperwork. Plan a budget for your marriage license and ceremony if you choose to do the civil ceremony at home. Include any additional wedding-related products you may want. Include items like invitations and save-the-date cards in your at-home expenses.
Marriage license
Civil ceremony
Wedding rings
Wedding dress or suit
Save the date cards
Wedding invitations
5. Avoid Paying Extra Fees at Your Resort
Choose a tropical beach for spectacular wedding photos.
After selecting your wedding package, you'll likely be presented with a list of add-ons. They can be excellent adds to your wedding if you have the money. You don't need to reserve any additional if you don't have any wiggle room, though. Ensure that every visitor stays at your resort. 80% of your guests must be staying at the resort, on average. You will need to purchase a day pass for any guests who are not resort guests in order for them to attend your wedding. Depending on the wedding event, the price per attendee might range from $25 to $75. Many couples desire quality pictures. Ask about vendor costs if your package doesn't include a destination wedding photographer or if you want to hire a better one. Anyone that travels to the resort for your wedding will be charged a vendor fee by the resort. It can be worthwhile to pay the price if you have your heart set on a specific photographer or vendor. Make sure you are aware of it up front and budget for it.
6. Save Money On Travel For Your Destination Wedding
Think about the season of the year you'll be there. Travel will cost extra during the busy season. You can travel instead during the low or shoulder season to save money. High season varies depending on where you're going. The ideal times to travel to your location should be discussed with a travel agent. By taking different flights, you can reduce your airfare costs. Weekday flights may be less expensive than weekend flights, depending on where you live. Ask your travel agent for price quotations on a couple other days if your travel dates are flexible.
How to Plan a Small Destination Wedding
There are several justifications for organizing a small destination wedding. Perhaps you're trying to cut costs, or perhaps you want to avoid the turmoil that comes with having a large guest list. There are moments when you just don't want a lot of eyes on you! A destination wedding is the ideal answer if you want a modest wedding for any reason. You now have a solid excuse for keeping your guest list short. Your preparations will be straightforward; just select a resort and a package, then pack your bags. Find a place you are interested in and start looking at their wedding packages if you want to organize a modest destination wedding at an all-inclusive resort. For groups of ten or fewer, most resorts provide a straightforward, affordable package. Make sure you understand how they count people by reading the fine print. The pair will often be one of the 10 persons. Therefore, you can still use the least package and invite an additional 8 friends. Sometimes the basic wedding package is free when you reserve 5 rooms, allowing you to further save costs. Many resorts offer elopement packages if you want an even smaller wedding. A private ceremony on the sand can be followed by a passionate feast. You can go to the resort nightclub for the ideal wedding for two if you wish to dance there with your new husband.
Free Weddings at All Inclusive Resorts
Free wedding packages are available at several all-inclusive resorts. Ask your wedding resort for specifics as each resort will have different requirements. If you reserve five or more rooms, most resorts will provide a free, basic package. The amount of nights you've reserved will be taken into account at other resorts. Once you start making a lot of reservations for rooms, certain resorts may even provide you additional benefits. You will be given extras like a complimentary cocktail hour, exclusive welcome parties, or after parties for your wedding if you reserve 10, 20, or more rooms.
Fantastic Wedding On a Small Budget
The basic or free wedding package will be excellent if money is truly limited. You'll be in a stunning resort, taking advantage of delectable food, delectable drinks, and a lovely beach. If you decide to remain with the standard package for your wedding, don't worry. Some couples are concerned that their nuptials will be too generic and similar to all the others. The fact that resorts host so many weddings proves that they are excellent wedding venues. However, it doesn't matter if they do 100 marriages exactly the same. Which weddings are your guests going to, exactly? One. Yours! No matter how many times it has been done, your wedding will be the only occasion when you or your guests see it. Resorts are experts at hosting weddings because they do it frequently. Your wedding will undoubtedly go off without a hitch. Additionally, no two weddings will ever be identical. Your personality, your sense of style, and your guests are unique. Even if you choose the normal resort package, only you and no one else will attend your wedding. You and your guests will enjoy yourselves at the resort and at your wedding if you select the wedding that meets your budget.
Destination Wedding Planner Book
Planning an all-inclusive resort wedding? It's simple to begin using the Destination Wedding Planner. To assist you in selecting the ideal resort for you and your visitors, the book is jam-packed with facts and comparison charts. Additionally, there are worksheets, checklists, and advice for everything from packing your bags to selecting your wedding package.
Your application for the scholarship needs you to submit an essay about yourself. How simple could something be? You have, after all, been residing alone for at least 17 years. You are the only one who truly knows yourself. When you try to start typing on your computer, your mind becomes blank. All of a sudden, everything you know about yourself makes you feel undeserving of a $5,000 scholarship.
What on earth can you write about to pique the scholarship committee's interest sufficiently? Check out our detailed instructions on how to write a college essay on yourself before you start stressing.
Step 1: Brainstorm
Any scholarship essay prompt should be approached by first doing some thinking. Before you begin writing, we strongly advise that you take some time to consider the essay prompt. In addition to sparking your imagination, doing this will improve the organization and coherence of your essay.
Brainstorm Ideas
Sit down in a quiet area with a pen and paper to begin brainstorming. Consider your upbringing, your family's financial situation, your academic record, your early years, your education, the sports you participate in, and anything else that contributes to who you are. If you're having trouble starting a discussion, try talking to your parents or friends about yourself. Make notes on the paper about yourself.
Dig Deeper
It's time to go deeper into the information you've provided about yourself. Your scholarship essay should attempt to persuade the scholarship committee that you are deserving of winning by telling a story about yourself. How can you make your own experiences into a gripping narrative? What personal details can you share that will help people know who you are?
It is beneficial to consider your audience. Learn more about the scholarship provider to accomplish this! Read the "about" section on their website. What values do they uphold? What sort of learners do they honor?
How much you had to study to earn your 3.8 GPA would be of interest to your audience. Your GPA and exam results may have aided in your admission to college, but they may not be sufficient to secure you a scholarship. Numerous kids have GPAs that are almost perfect, so writing about it can be a little dry.
Your readers are interested in learning about the difficulties you've encountered or the memorable experiences you've had. Did your parents leave you alone after school every day while they were at work to supervise a younger sibling? Have you ever had mental health issues or learning difficulties that made it difficult for you to study? How did you come to the decision to major in business in college? When we say to dive deep, this is what we mean. go beneath the surface. Discuss your past experiences that led you to your current position.
Step 2: What to Include in an Essay About Yourself
Naturally, a scholarship essay on yourself can cover a lot of ground. Your essay can go in a lot of different directions. Keep in mind that you should include facts about yourself in your essay to make it interesting to read. It's okay to include information about yourself in your essay. But you had better add a lot of flavoring to those facts.
Here are some suggestions for your essay.
Topics You Can Address in Your Essay
You can introduce yourself in your essay in a variety of ways. Remember that the subject of your essay must be you and your unique life experiences. You can base your essay on one or more of the following subjects.
Experiences that have inspired your degree choice.
Challenges you’ve faced that have impacted your life and education.
Unique hobbies you have or the sports you play.
How you’ve changed over the years.
Your experiences in school.
Professional goals you have for the future.
Your achievements.
Special relationships that have inspired you. If you choose this topic, remember the essay still needs to focus on you.
Your essay should cover a subject that you may relate to your academic or professional objectives. If it didn't have any bearing on your education or profession, it probably isn't pertinent for the scholarship.
Keep in mind that you must discuss both the why and the how. For instance, why are you working toward a legal degree? Why did you take this path to a degree? How might a legal degree benefit your future plans? What life events inspired you to want to practice law?
Step 3: Sketch an Outline
It's time to get organized now that you know what you'll write about. The last thing you should do before beginning to write is to create an outline. Decide on one or two of the subjects we recommended, then start planning out what you'll cover in each paragraph. An introduction, three to five body paragraphs, and a conclusion should make up your essay.
Check out our advice on what to include in your essay and what not to:
Do:
Make an impression right away with your writing.
Put yourself in the position of the reader. Are you able to express yourself sufficiently in your essay? Do you persuade the reader that you are deserving of the prize?
Make inquiries and learn as much as you can about the company. Make an effort to join their initiatives. Do your interests or objectives align with those of the organization? What benefits can you provide the company?
Include only pertinent details. Something is generally useless or inappropriate if it seems so.
Since this is about you, write in the first person.
Specify your examples. Instead of stating that you suffered during your freshman year, provide examples.
Display your abilities and accomplishments.
Make sure your essay is engaging. It's not good enough if it doesn't captivate your viewers right away.
Edit and proofread your essay. Your scholarship could be lost due to such little spelling errors. They detract from your writing and don't effectively convey your professionalism to the reader. Everyone makes mistakes, but it is your responsibility to proofread your work before submission.
Apply the proper format.
In your transcripts, describe your academic shortcomings. This is your time to own up to the 'D' you received in math your freshman year. Write about your difficulties with algebra and how obtaining a tutor inspired you to get better. By placing the blame on a teacher, do not in any way use the victim card!
It's normal to make mistakes! Write about the lessons you took away from your errors and how they strengthened you.
Be genuine and write as you speak (of course, with correct grammar). It's not as amazing as you might think to try to dazzle with thesaurus words.
Adhere to the essay's instructions! Even if you write the best essay possible, you run the chance of being disqualified if you don't adhere to the rules.
Don’t:
Falsehood: Making up tales to impress the scholarship committee won't work. Lying screams fakeness. We assure you that scholarship judges can tell when kids are lying because it is so clear.
If you believe that boasting about your 4.0 GPA would get you a scholarship, you are mistaken. Show off your assurance without coming across as haughty or conceited.
Use the essay as a platform to share your most private family information. This is not the place to sob uncontrollably or reveal private details.
Regarding your career aspirations, be vague. Which does it make more sense to reward—a student with clearly defined ambitions or one who has no idea what they want to accomplish with their lives?
Reiterate the same information repeatedly. Your readers will start to snore!
Apply cliches. Overused cliches are bad! Be brave and original.
Step 4: How to Start an Essay About Yourself
Your essay on yourself should fascinate readers from the get-go, just like all other scholarship essays should. Write a captivating start to your essay that will entice people to keep reading. Start off by sharing a personal tale or experience.
Also, avoid using quotes and phrases like "from a young age" or "for as long as I can recall." These are not your words; they belong to someone else.
You should include a thesis statement that explains to the reader why you are applying for the scholarship towards the conclusion of your introduction paragraph. They ought to be able to taste your excitement and discern the reasons for your application.
How to Start an Essay About Yourself Example
When it comes to my passion for teaching others, you might say I wasn’t given much of a choice in life. As the older sister of four, it was my responsibility to lead the way and teach my two younger brothers and sister. At least, I assumed that responsibility. I helped them with everything from school projects to packing for camp in the summer. It’s no surprise to me that years later, I have chosen to pursue a bachelor’s degree in Education at the University of Texas in the fall. With this scholarship, I will be able to pursue my degree in education and return to my hometown to teach in a local elementary school after graduating.
Step 5: What to Include in Your Body Paragraphs
The bulk of your scholarship essay will be in your body paragraphs. The scholarship readers will learn more about you through this. Each of your body paragraphs should present an argument with details and examples to back it up.
Your goal in these lines is to as fully express your personality as you can. Additionally, you should make a connection between your points and your long-term academic and professional objectives, as well as the scholarship you're asking for. Be careful to explain to the reader how the scholarship will assist you in achieving your objectives.
How to Write a College Essay About Yourself Body Paragraphs Example
My duty as a teacher to my younger brothers and sister was merely the beginning. As soon as I was of legal age, I began babysitting my neighbors on weekends to supplement my income. Sure, I had to give up my weekend nights with friends, but I was able to save a lot of money from my Friday and Saturday night performances. It was never just about the money for me. I enjoyed spending time with the small children. I would plan interesting activities for them, such as "restaurant night," in which we would construct menus and make ice cream sundaes in the kitchen.
I knew I wanted to be a teacher by the time I was in high school. In high school, I attended many subjects that reaffirmed my dream. I especially enjoyed my early childhood education class, where I learned about theories of childhood development, classroom management practices, and curriculum building. I even began to create my own curriculum and forced my younger siblings to attend "school" with me as their teacher. I don't think they were thrilled with all those extra hours of school...
I finished my internship as a teacher's assistant over the last year. Every Tuesday and Thursday, I spent half a day at the local elementary school working with a third-grade teacher. This experience taught me so much, such as how to manage behavioral issues and how to encourage hesitant pupils to engage in lessons. I can't wait to return to my hometown after college and work as a teacher.
Step 6: How to End an Essay About Yourself
You could be tempted to rush through writing your essay's conclusion paragraph by that point. However, your final paragraph also plays a crucial role in leaving a lasting impression. Take your time with it.
Your essay's final paragraph should summarize its key ideas and bring everything together. The following should be said in your ending clause:
To put it another way, restate your point.
Give a summary of the points you tried to make in your body paragraphs.
Your conclusion paragraph should end with a significant future-focused notion.
How to End an Essay About Yourself Example
You could argue that my childhood shaped who I am today, but I believe it is much more. Without my education and employment throughout high school, I would not have the confidence I have today in myself and my future aspirations. I am really pleased to begin my studies at the University of Texas and continue to build the tools and abilities necessary to become the greatest teacher I can be.
Step 7: The full Example of How to Write a College Essay About Yourself
It's time to put it all together now that you know how to create a strong introduction, conclusion, and body paragraphs. Here is the whole illustration:
When it comes to my desire to teach people, you could say I wasn't given many options in life. It was my obligation as the eldest sister of four to show the way and teach my two younger brothers and sister. At the very least, I accepted that obligation. I assisted them with everything from school projects to packing for summer camp. It comes as no surprise to me that I've decided to pursue a bachelor's degree in education at the University of Texas in the autumn. With this grant, I will be able to complete my education degree and then return to my hometown to teach in a local elementary school.
My duty as a teacher to my younger brothers and sister was merely the beginning. As soon as I was of legal age, I began babysitting my neighbors on weekends to supplement my income. Sure, I had to give up my weekend nights with friends, but I was able to save a lot of money from my Friday and Saturday night performances. It was never just about the money for me. I enjoyed spending time with the small children. I would plan interesting activities for them, such as "restaurant night," in which we would construct menus and make ice cream sundaes in the kitchen.
I knew I wanted to be a teacher by the time I was in high school. In high school, I attended many subjects that reaffirmed my dream. I especially enjoyed my early childhood education class, where I learned about theories of childhood development, classroom management practices, and curriculum building. I even began to create my own curriculum and forced my younger siblings to attend "school" with me as their teacher. I don't think they were thrilled with all those extra hours of school...
I finished my internship as a teacher's assistant over the last year. Every Tuesday and Thursday, I spent half a day at the local elementary school working with a third-grade teacher. This experience taught me so much, such as how to manage behavioral issues and how to encourage hesitant pupils to engage in lessons. I can't wait to return to my hometown after college and work as a teacher.
You could argue that my childhood shaped who I am today, but I believe it is much more. Without my education and employment throughout high school, I would not have the confidence I have today in myself and my future aspirations. I am really pleased to begin my studies at the University of Texas and continue to build the tools and abilities necessary to become the greatest teacher I can be.
Final Thoughts
You could find the scholarship essay prompt "Tell Us About Yourself" frustrating. It can seem intimidating, but once you know how to approach it, it's really not that bad.
You can succeed if you follow these suggestions. It's time to get writing!