There are two ways to insert a text box in a Google Document. You can create a table with multiple rows and then insert a text box in the table. You can also edit the text box by editing its appearance. If you want to create a fillable form, you can also insert a fillable form. Both ways are described in the next section. To get started, open a Google Document.
Create a table with multiple rows to insert a text box
The easiest way to insert a text box in Google Doc is to use a drawing tool. This tool will allow you to adjust the height and width of a text box. You can even use it on mobile devices. The main difference between the drawing tool and the regular text box is that you can customize it. In this article, we will show you how to create a text box in Google Docs.
To create a table in Google Docs, first click the upper-left box. Next, click the Insert Table button. You can then type text in any cell. You can change the font, color, and size. This method gives you more creative freedom and flexibility, but it will take more time. Adding text boxes and shapes to your table will allow you to insert them into your document more easily.
Edit a text box
When using Google Docs, you can easily edit a text box. Just click the text box you want to edit and choose the formatting options that you want. You can choose the text color, font, border style, and line spacing. You can even change the background by clicking on the paint bucket icon on the main toolbar. You can also change the font style and color and add a dash to it.
You can also set apart your text by selecting a table or drawing in Google Docs. While both methods will create a text box, the text in a drawing or table will have distinct layout and formatting capabilities. If you accidentally delete your text box, you can easily undo it. It will appear as a placeholder. It will remain available until you re-add it to your document. Alternatively, you can insert a text box in a drawing.
Add a fillable form
You can create a fillable form within Google Docs and track the responses from your survey. Once you've received the data, you can also generate a visual report. Fillable forms can be embedded on your website or included in social media posts or emails. Note that this article is not sponsored by Indeed.com, but provides a general overview of how to create a fillable form within Google Docs.
To add a fillable form to a text field, first create a label next to the empty line. For example, if you have three fields, add the label "Two Lines of Text" to the cell label. Now, select the left-most cell label, change its text to "Sample Answers." You should now have a form that looks similar to the example below.
If you've recently moved to a new city, state, or country, you may want to learn how to change address on your driver's license. If you've moved recently, or are in the process of moving, there are several important steps you need to take. You should update your address with the SCDMV. Once you've updated your address on your driving license, the South Carolina Election Commission will receive it.
Update address on driving licence
If you have moved, you will need to update the address on your driving licence and health card. You will also need to update your vehicle permit. To update your vehicle permit, visit a ServiceOntario centre. If you already have one, you must bring it with you. If you don't, you may need to pay a replacement fee. Make sure you provide the DVLA with your complete new address, including street and unit numbers. Make sure you provide the postal code and city as well.
In order to update the address on your driving licence, you need to have a new driver's license, non-driver ID, or permit. If you have a permit, you must fill out form #VL-040, which requires an appointment. In Vermont, you will need to make an appointment at the DMV to change your address. You should also make sure your license is not disqualified because of your old address.
SCDMV sends changes of address to South Carolina Election Commission
If you're not registered to vote in South Carolina, you should make an appointment to change your address with the South Carolina Department of Motor Vehicles. You can do this online or by mail. You should remember to bring all required documents, such as a photo ID, when you register. Make sure that the address on your voter registration is current and that your voter registration form is up-to-date. Then, mail your updated voter registration card or form to the county voter registration office.
To update your South Carolina driver license, go online and fill out the address change application. The form requires a South Carolina ID, date of birth, social security number, vehicle plate number, and driver's license number. To change your address in South Carolina, you will need to have a birth certificate or social security card or a copy of your driver's license. You should also send a copy of your driver's license to the Election Commission.
If you're wondering how to write a formal letter, there are a few things you should pay attention to. These include the letter's format and salutation. You can also find useful tips about inside address and closing. In this article, we'll take a closer look at each of these areas. Once you have mastered these basics, you'll be well on your way to writing an effective formal letter.
Getting it right with a formal letter
The first step to getting it right with a formal letter is to proofread the letter carefully. You should check spelling, grammar, and complete sentences. While spellcheckers will catch many of these errors, you should make sure the sentence structure is clear and that the letter flows logically. Also, consider having someone else proofread the letter before you send it off. Never rush to finish writing a formal letter!
In addition to spelling and grammar, you should use appropriate salutations. You should use "to whom it may concern" when addressing formal letters. You should never use an informal salutation like "Dear Sir." Instead, use the formal greetings like "Dear Mr. X." This will create a personal connection with the recipient and encourage them to read the rest of the letter. Also, use the proper heading.
Format of a formal letter
The first thing to do when writing a formal letter is to state the purpose of the letter and its subject. The second paragraph should be dedicated to the subject matter and should include relevant details. The final paragraph should state the expectation the receiver should take and should be closed with a complimenting phrase. There are certain elements that should be included in every letter, including the recipient's name, title, and address. You can refer to the following examples to know how to format a formal letter.
In a formal letter, you should include the date, the sender's address, and the recipients' address. The letter should be written single-spaced with one-inch margins. You should also include your signature and closing. Moreover, make sure you use proper grammar and punctuation. You should also begin each sentence with a capital letter. The recipient should be appropriately named, and the designation of their name must be clearly indicated.
Salutation
The salutation in a formal letter sets the tone of the correspondence, letting the recipient know what the letter is all about. The correct salutation for a formal letter is a title, such as "Dear Mr. Smith," but you may also use someone's first name if you aren't sure of the recipient's gender or age. Whether you choose to use a first or last name or a title depends on the context of the letter and its purpose.
The subject of a formal letter is just as important as the salutation for a casual letter. The subject lays out the main intention of the letter and gives the recipient maximum information with the least amount of words. A formal letter salutation is usually something along the lines of 'Dear Sir/Madam' or "Dear Madam," with a comma or colon after the name. After the salutation, the body of the letter should be left justified.
Inside address
The inside address is the part of a formal letter that the recipient receives. It should start with a courtesy title, such as Mrs. or Mr., and then the person's first name and last name. Men and women should use courtesy titles appropriately. If you are not sure, you can ask employees at the company or call the company. In general, women prefer to be addressed as Mrs., Ms., or Miss. If you're unsure of whether a particular woman will prefer a particular courtesy title, use it. If the recipient has another title, use that as well.
When writing an inside address, it's important to remember that the text of the letter should align with the outside. In other words, the letter should be read left to right. It should also include a left margin for the text, and the left margin should be at least one and a half inches. Besides, a margin should be left, which helps the recipient route the letter if the envelope gets damaged or lost. Lastly, the inside address should be short and concise.
Closing
You can't use a simple closing like 'yours truly' in every letter. You have to understand the reader's situation and the tone of the letter. Also, make sure that you are not too casual when closing the letter. Here are some ideas that will help you close a formal letter:
When closing a formal letter, avoid using your first name. Instead, use your full name to avoid confusion. Also, when capitalizing your letter, make sure you capitalize the first letter of the first word. This will make it easier for the reader to identify who you are. You can learn more about formal letter closings in our previous article. Just make sure to follow these tips to avoid mistakes and keep your correspondence professional. Good luck!
There are many benefits to establishing a business as a teen, and there are really no reasons not to.
Here are 6 things to think about as a young entrepreneur to increase your chances of success.
1. Is your business idea feasible?
You want your new company to be successful when you first launch it.
However, it happens frequently for new business owners, regardless of age, to become hooked on a venture that isn't really viable. You probably won't have the knowledge or the time to create the newest technological advancement as a teenager.
Instead, to increase your chances of business success, choose a concept that you are confident you can implement—from the original development of the product or service to its marketing to your confidence that there are enough people in your area who could profit from your venture.
Once you've decided on a concept for the good or service you want to offer, you need to identify the people who are most likely to be interested in using or purchasing it.
To respond, consider the following:
What issue is your company resolving for your client?
What preferences does your intended market have?
Where is it most probable that your target consumer will look for the good or service you're offering?
This is only a beginning point; to get a better understanding of how to appeal to your customer, you can do your own research and develop a client profile.
3. What the legal requirements are for you to run your business?
There are legal standards that must be followed by every firm producing money in the United States, regardless of your age.
One of your first considerations as a kid establishing a business should be how to obtain the licenses and documentation required to make your enterprise legitimate so that you can start selling to clients.
To find out what you need to do to lawfully establish your firm, check online or with local officials.
4. What unique value are you going to provide to your customers?
Now that you've identified your product or service and the target market for it, you need to determine why clients will choose your company over one that provides a comparable good or service.
This is your Unique Selling Point (USP). Do you have a product or service that is priced much less than those of your rivals? Do you provide a service that a customer cannot obtain elsewhere? Determine your company's USP to attract customers (and keep them).
To keep customers coming back to your business and to benefit from word-of-mouth marketing when they recommend your excellent product or service to others, give them an extra tip: overdeliver on the value you provide.
5. How are you going to market your business?
The saying "build it and they will come" is no longer as applicable in the present business world, when competition is fierce in almost every industry. This is because entrepreneurship is becoming more and more common.
Since you're presumably not flush with cash as a young person, you need to determine the best way to target them at a minimal cost using your improved understanding of your customer.
If you're developing an online business, social media is a wonderful approach to target the kind of customer you want because different social media platforms are popular with different demographics.
To target local leads, you can, however, advertise through your network of contacts if you provide a local service, print business cards and post them, and put up fliers. Similarly, websites like Craigslist can assist you in online local targeting.
6. What is your plan for the future of your business?
As a teenager, you go from high school to college or straight into the workforce, making these years some of the most transitory of your life. You'll need to give the direction you want your company to take over the following few years more thought.
Is your business a means of earning supplemental income? Or do you intend to use your business as your primary source of income after completing your education?
In either scenario, you should create a long-term plan for your company's future, including how you want to continue operating it or shut it down as you adjust to the changes that come with being a young adult.
We all know what it's like to mourn the loss of a friend, family member, or other close person; we wear black, go to the funeral, and honor the life they lived.
The process of dealing with someone's death, however, becomes more challenging if you are the executor or chosen representative.
You find yourself suddenly in charge of sorting through this person's life, possessions, and documentation.
Not only is it difficult to determine which papers must be retained, but it's also not always clear how long they must be kept.
While a qualified law firm may assist you in sorting through records and choosing which documents to save, the following list of items should be preserved and for how long:
HOW LONG SHOULD TAX RETURNS BE KEPT?
The tax returns are typically the main issue when handling a deceased person's legal records.
The four-year statute of limitations applies to tax audits. This permits the CRA (Canada Revenue Agency) to audit the deceased's tax returns at random for the following four years.
Despite this statute of limitations, it is advised that you keep all tax documents for at least six years in case any issues with the decedent's returns come up.
This contains any files that have been filed as well as significant tax forms and receipts.
Documentation for a deceased person goes beyond tax filings.
Despite the fact that keeping track of all the paperwork may seem burdensome, the following key records should be preserved in four different categories:
LEGAL RECORDS
Any document pertaining to the law, whether it be federal, provincial, or local, is considered a legal record. Records of this nature ought to be preserved indefinitely.
This implies that all legal records must be transferred from beneficiary to beneficiary.
Therefore, if you have inherited these documents, you should save them with your own important documents and provide them to your beneficiary.
These records include the death certificate for the deceased as well as the records listed below:
Birth certificate
Social security card
Marriage certificate
Divorce decrees
Legal will
Death certificate
Any of these documents can be needed to handle estate-related business. Particularly, you should have proof of your marriage, prenuptial agreement, and/or divorce since if you don't, estate issues might arise.
If nothing else, you might want to save these significant papers for family history or genealogy purposes.
FINANCIAL DOCUMENTS
The necessity of preserving the decedent's tax returns has previously been mentioned, but there are additional financial records that must be preserved as well.
These records need to be kept for at least three years after any required estate taxes have been paid.
Financial records of importance include:
Account statements
Receipts
Pay stubs
Retirement benefit and distribution statements
Tax returns
These documents might be required during a tax return or possibly an audit, so it is essential to have them on available.
MEDICAL DOCUMENTS
It is recommended to save medical records and information for at least ten years.
However, due to privacy rules, you would need to be a designated representative or legal executor of the person's estate in order to access their medical data.
Important medical records include, for instance:
Health insurance cards
Medical tests
Medical history
Prescriptions
Hospital discharge papers
These records will assist in determining the deceased's health coverage options and any ailments they may have had (or did not suffer from).
This knowledge is particularly beneficial because it enables family members to determine whether any of these ailments are inherited.
Additionally, you might wish to maintain track of the visits and treatments that were given by keeping paperwork of the outcomes of hospital stays.
OTHER IMPORTANT DOCUMENTS
After a person dies, you could find yourself going through a collection of unrelated paperwork.
How do you decide what to save and what to discard?
Be sure to maintain the following records before discarding anything that is not legal, financial, or medical:
Diplomas
Home and car insurance
Rental agreements
Mail
If you and the deceased lived together, you can still handle their correspondence and read their mail. You might want to think about getting in touch with the sender to let them know the person has passed away.
Before you may make any changes to the deceased's postal service if you did not reside with them, you must show that you are the executor of their estate.
In addition to mail, you should aim to maintain these records for at least 10 years, especially the home and auto insurance records because they can be useful in effectively administering the estate.
Other than that, degrees are rarely legally necessary for anything but could hold sentimental value.
ORGANIZING IMPORTANT DOCUMENTS
It can be difficult to sort through a deceased person's possessions, especially when there is paperwork involved.
Purchase an accordion file folder to arrange the workload and make it less stressful by dividing the paperwork by year.
Every year, check the folder to see what information no longer needs to be preserved and make sure to label everything.
Do not hesitate to get in touch with your qualified attorneys if you are managing the papers of a deceased family member, friend, or loved one.
We will take the time to help you understand the paperwork and make sure that the important papers are kept secure.
The kind of slideshow you're making in Microsoft PowerPoint may or may not benefit from the use of music. You can wish to use a lively exuberant music on a slide or a delicate, understated melody all through the presentation.
We'll go over a few alternative methods for adding music to PowerPoint before demonstrating how to use a single song on a slide or play background music continuously.
Upload a song from your computer
Uploading a song from your PC is most likely the simplest approach to include music in your presentation. This song may be one from your playlist or one you've saved and frequently listen to.
Step 1: Open your PowerPoint presentation and select a slide to add the music.
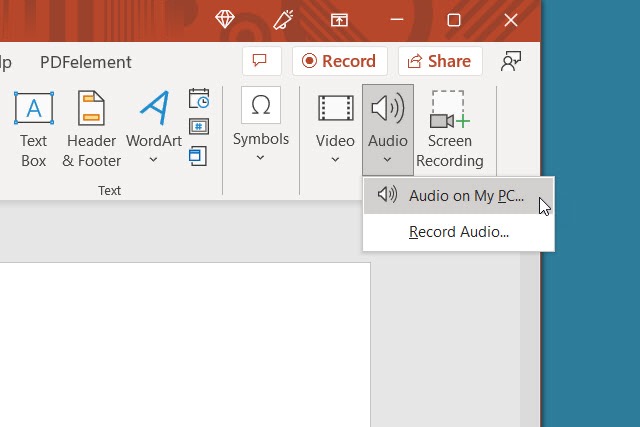
Step 2: Go to the Insert tab and choose the drop-down arrow for Audio on the right side of the ribbon.
Step 3: Pick Audio on my PC, browse for the music file, and select Insert.
Step 4: You’ll then see an audio icon on your slide for the song.
Step 5: Use the Play button to listen and the Playback tab to adjust the playback options.
Download free music
Perhaps you already know the kind of song you desire, but your computer doesn't contain a copy of it. There are a few web sources where you may get free tracks with no royalties for presentations.
Fesliyan Studios Inc.: Choose a genre at the top such as commercial, happy, sad, or relaxing. Press the Play button to listen, then check out alternate versions where available. Choose Download to get the song.
Chosic: You’ll see a slew of songs for presentations from upbeat to soft. When you hear the song you want, select Download > Free Download.
SoundCloud: If you’re already a SoundCloud listener, this is a good option for presentation music. Type “free downloads” or similar into the search box and review the results. When you find the song you want, select More or the three dots to download the tune.
There are a few ways to download MP3s from YouTube if you can also discover free music there.
Once you've downloaded a music from this list, store it to your device and then upload it to the slideshow as previously mentioned.
Record music while creating the slideshow
You can record a song right in PowerPoint if you're fortunate enough to be musically talented. Make your own presentation music by warming up your voice chords or picking up a guitar.
Step 1: Open your PowerPoint presentation and select a slide to record the music.
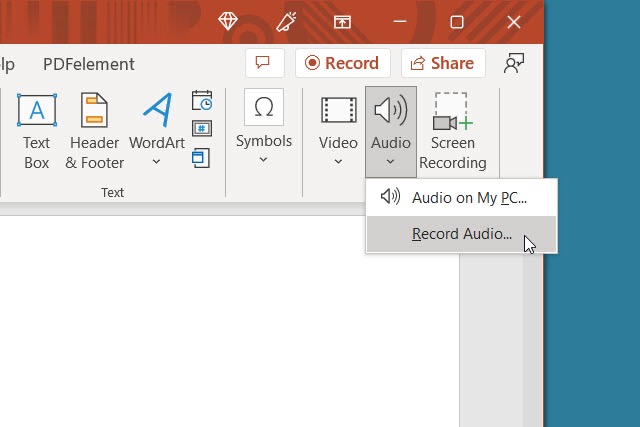
Step 2: Go to the Insert tab and choose the drop-down arrow for Audio on the right side of the ribbon.
Step 3: Pick Record audio. Note: You must have either a built-in or external microphone for your computer.
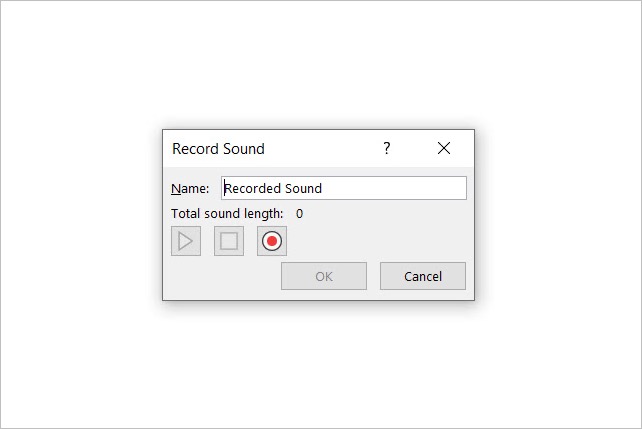
Step 4: When the Record Sound box appears, select the red, round Record button to start recording.
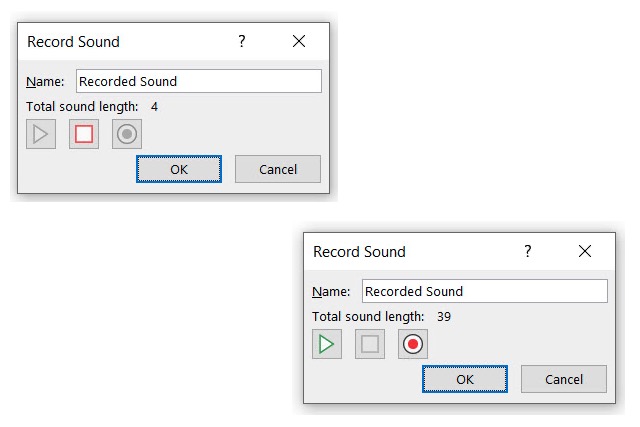
Step 5: Press the square Stop button when you finish. To listen to the recording, press the green Play button.
Step 6: When you finish, select OK to insert it onto the slide.
Step 7: You’ll then see the audio icon just like with an inserted audio file. Press the Play button to hear the recording.
Add an offscreen video
Sometimes a video is associated with the perfect song for the circumstance. There is a workaround to include that song in your show even though you can't currently just play the audio and you definitely don't want the video as part of your presentation.
Step 1: Open your PowerPoint presentation and select a slide to add the video.
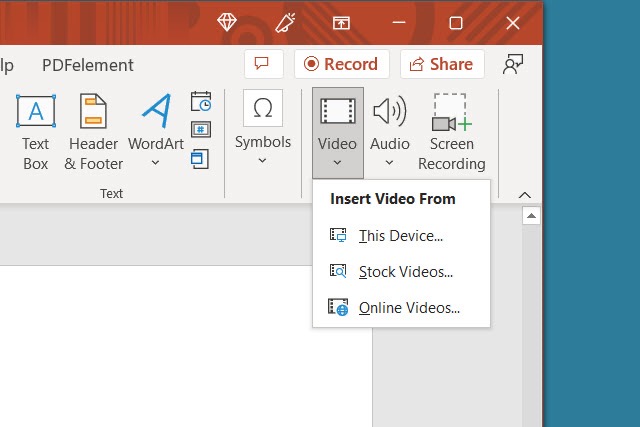
Step 2: Go to the Insert tab and choose the drop-down arrow for Video on the right side of the ribbon.
Step 3: Pick This Device, Stock Videos, or Online Videos and follow the prompts to insert the video.
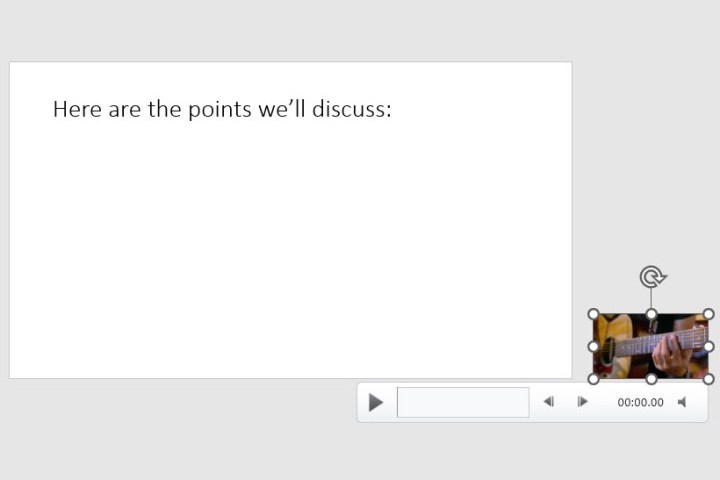
Step 4: When the video appears on the slide, drag a corner or edge to make it smaller and then drag it off of the slide to one of the sides.
With this, you can play the video to hear the audio only—you won't be able to view it in your slideshow.
Step 5: Select the video and use the Playback tab to adjust the options for playing it when clicking the slide or automatically.
Play the song or use as background music
Once you've added the music to PowerPoint, you can decide whether it should play continuously during the presentation or only on one slide.
Step 1: Go to the slide containing the music and select it.
Note: Depending on your preference, you'll probably want the file on the first or second slide if you want the music to play continuously throughout the slideshow.
Step 2: Head to the Playback tab and choose to play the song with the slide or as background music.
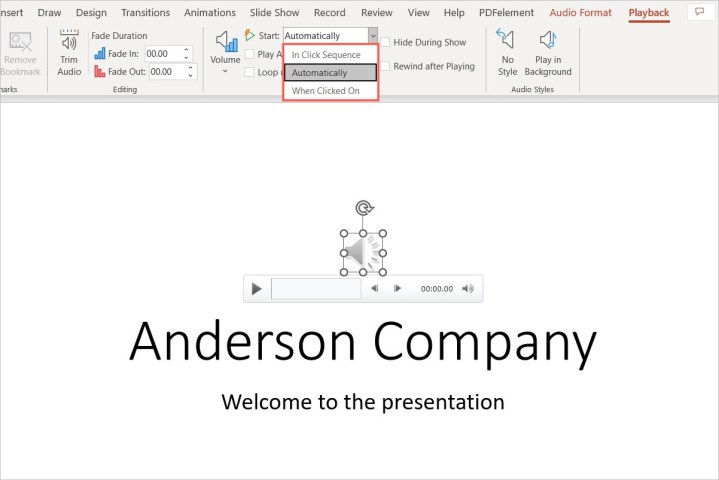
Step 3: To play the song only on that slide, choose the Start drop-down box in the Audio options section of the ribbon and pick how you want the music to begin. You can select In click sequence, Automatically, or When clicked on. When you advance to the next slide, the song stops playing.
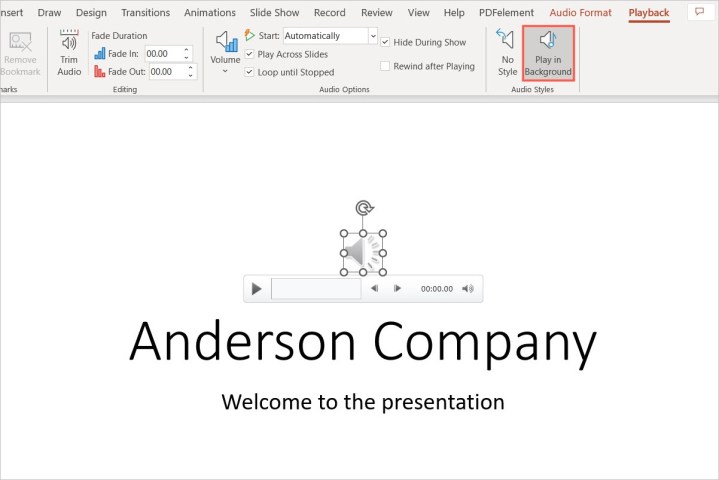
Step 4: To play the song throughout the presentation, select Play in background in the Audio styles section. This automatically checks the boxes for Play across slides and Loop until stopped. You can also choose an option in the Start drop-down box for how to begin playing the song.
Remember that the method mentioned before, which uses video files, does not apply here; only audio files do.
Step 5: Adjust any other options on the Playback tab per your preference. You can increase or decrease the volume, rewind the song after it plays, or add a fade in or out effect.
After you've included the music, don't forget to practice your presentation to make sure it sounds the way you want it to. You can also think about including closed captions for hard of hearing people.